
Die Cut Crazy Valentines Blog Hop

Welcome to the Die Cut Crazy Magazine Valentine Blog Hop !. The designers have made some wonderful Valentine projects to inspire your own crafting with your die cuts. If you just joined our hop, be sure and go back to the Die Cut Crazy Magazine Valentine Blog Hop to learn how you can enter to win a prize from Die Cut Crazy Magazine when following the hop from designer to designer.
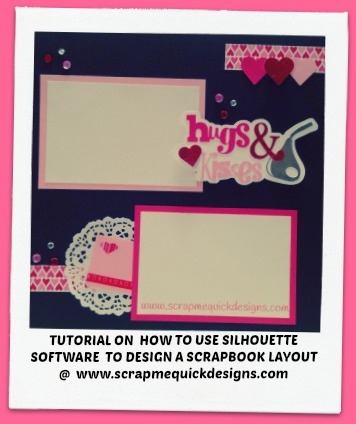
Today I wanted to share a Valentine Scrapbook Layout using die cut images. I put together a quick tutorial on how I use my Silhouette Cameo to do my layout design before I even start cutting out shapes for a layout. Hope you are inspired and learn a thing or two from this.
1. Start by selecting an image you want to use on your layout and place on your design software mat. I used the Hugs & Kisses Title from Miss Kate Cuttables in the Silhouette Online Store..

2. Remove or change any of the image you don’t want to use on your layout. Notice that I deleted one of the background layers and two of the kisses layers.

3. Group the image pieces back together so you can move them around on the screen easier as you begin your layout design. Do that by dragging the layers on to the background piece, use the selection arrow tool and draw around the entire layered image and click on GROUP. Now you can move and re-size all of that image as you need in your design. Note: you will need to ungroup these layers when you get ready to cut them out.

4. Select your next image you want to use and place on a new mat tab in the software. Here I selected a Layout Kit by Lori Whitlock in the Silhouette Online Store. I wanted to use the hearts and the journal card only, so I removed the other pieces by deleting them. Next I copied and pasted the hearts and journal card on to the first mat tab.

5. Use the drawing tool (or simple rectangle shapes) to create photo mats for placement on your layout. Replicate as many times as you need. Note: I wanted (2) 4X6 photos on my 12X12 layout so used two rectangles to represent them in my design.

6. Layout all the pieces on your screen mat that you want to use. Move them around and re-size until you get it approximately the way you might want it on your actual paper layout page. Note: This helps tremendously to be able to avoid wasting paper because you made your images too large or too small when you cut them out without this step.

7. Using the Color Fill option, start adding color to your shapes to give you an idea of what colors you might want to use on your actual layout. Add in other images if you need them, like I did by adding a doily piece. Note: In Silhouette software you can use the Object, Arrange function to move the pieces forwards and behind each other like I did when layering the hearts and moving the hugs & kisses title over the top of the photo mat.

8. Finish your design layout on the screen until you have it just the way you want to use as a guideline when selecting materials for your actual layout page. You can even add patterns to represent idea for paper you might use as I did here by adding a stripe pattern to some sections. Next, you can fine tune the sizes of the shapes for your actual cutting sizes and select. Note: This is fun to do and saves you a lot of trial and error time when you go to make your layout.

9. Drag the image pieces off the screen mat except for the image you want to cut first, add the material to your physical mat and follow standard procedures for cutting. Repeat until you have all your images cut out. Then assemble your layout. Note: Save your final layout design to your software library so you can use it in the future or even as a starting point for another layout.
HERE IS MY COMPLETED VALENTINE LAYOUT (the white shapes on the photo mats represents where my photos will go after we take them this year on Valentines Day)

Here is a close up of the Hugs & Kisses title and upper right embellishment corner. Note how I used red glitter paper for the hearts and the & sign. All of these were adhered using foam pop dots to add dimension to the layout. I used a mirrored silver paper for the “kiss” candy. And I added a few sequins to add a “little something extra” to the layout.

Here is a close up of the lower left embellishment cluster. Note that in my software design I used an image of a doily cut, but in my final design I used an actual doily instead of cutting one out of paper. The journaling card was cut out at full size but then partly tucked under the bottom photo mat after it was embellished with some heart washi tape and some patterned paper behind the cut out to tie all the elements together. Again I repeated the use of the sequins to add something extra to the over all design.

Thanks for stopping by the Die Cut Crazy Magazine Valentine Blog Hop. I hope my layout and tutorial helps inspire you to create your own Valentine layout. Please leave a comment to let me know you stopped by.
Next up in the hop is Anna http://craftwithanna.blogspot.com. Go see the amazing project she has prepared for you to enjoy!
If you just joined the hop, here is a list of designers so you don’t miss any.
Debbie http://www.scrapmequickdesigns.com/ YOU ARE HERE
Anna http://craftwithanna.blogspot.com
Allie http://mycardparty.com
Nancy www.scrapperatheart.com
Melissa www.cardtreasures.wordpress.com
Carlyann www.sweetncrafty.blogspot.com
Dianne http://wp.me/p31EIO-5U
Die Cut Crazy Magazine http://diecutcrazymag.com/ GO HERE TO ENTER TO WIN A PRIZE

All my comments are my own opinions on those products. I appreciate your support when you purchase using the post links.
Allie
What a cute layout and a great tutorial.
Allie
My Card Party
cygenovia
TFS, nice layout.
Pamela Danner
Adorable Valentine layout!
Pam
scrap-n-sewgranny.blogspot.com
Nancy Leppek
You have inspired me to scrapbook today Debbie! I really miss it! Great job with the blog hop and tutorial! Have a great day!
vicki dutcher
Fun layout and great tutorial
lisa808
Great L/O. Thanks for the tutorial. I will need to come back and study it again.
SiskiyouSue
Thanks for the tutorial, full of good info. Cute layout!
Sharon burns
Really cute layout!
kimnamsoon
Great layout! And thanks for the tutorial! Nice job!
Mel
what a stunning wee layout! Perfect for those little romantic pictures we all have!
Great hop so far!
Huggles Mel xx