
Cricut Explore: Easy Print Then Cut Steps

What to Expect from the NEW Cricut Explore Print Then Cut Feature
- Ability to use any Cricut Images, SVG’s and JPGS by using the new FLATTEN button in the Layers Panel to prepare to print (from your home printer) and then cut out with the Cricut Explore perfectly
- Abilty to Print Then Cut the “Print Ready” images already available in Design Space (without having to use the Flatten button)
- Ability to have Print Then Cut be dimensional with options to print and layer layer certain parts of the printed image
- Ability to BLEED a color border around your image to allow for more precise cutting edge to edge so you don’t see the white cardstock you printed on
- Ability to cut on a 8.5″ x 11″ size cardstock (there are plans to expand to full 12”X12” at a later date) Note: You still put it on a 12X12 Cricut mat to cut even though it cuts from a 8.5″X11″ sheet
Other CHANGES with the Print Then Cut Plug In Update
You will see these changes on the LAYERS Panel (after you have done the Plug In Update. See my post HERE about updates.
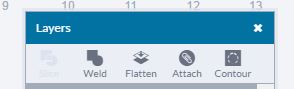
- SLICE gives you ability to cut away part of an image and to cut out one image from another image
- WELD will now allow you to only join over lapped image
- FLATTEN gives you ability to take any image and turn it into a one layered printable image
- ATTACH/DETACH has been added to the Layers box so its more handy to use
- CONTOUR allows you to remove some pre-designed shapes from Cricut Images
EASY PRINT THEN CUT STEPS:
Step 1. Start by loading an image to Design Space Mat. I used Minnie Mouse from the Cricut Disney and Friends Cartridge. Notice that Minnie has many, many layers that you would normally have to cut separately to assemble her to use on a project. Tip: While the image is in this mode, change the colors of each piece to whatever you would want them to print out.

Step 2. Highlight your image and then click on the new FLATTEN button on the LAYERS Panel. It will then compress all the layers of your image to make it a printable image. No more layers to cut. Just a flat image that you can send to your printer to print out. To do that, hit the GO button and it will prompt you to send image to the printer.
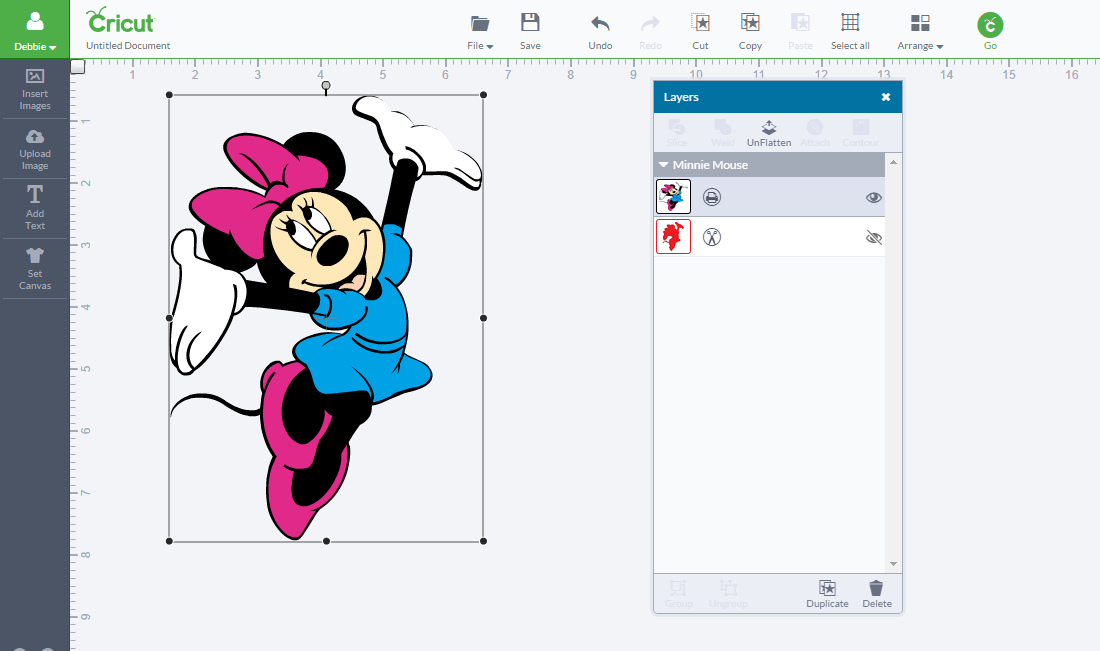
Step 3. As Design Space prepares to send a FLATTENED image to your printer, Design Space automatically has the BLEED feature set as the default. This adds extra ink around the shape of your image so you get a cleaner edge to edge cut. Great for avoiding white edges around your project if printing on what paper. Note: If you don’t want this bleed, just uncheck the box each time you use the Flattened feature.

Step 4. Load the printed image on your Cricut mat by placing in upper left hand corner of the mat. You will notice that after printing the image, it now has REGISTRATION MARKS around the image which is what the Cricut Explore machine will see to scan and cut around the image.

Step 5. The Cricut Explore machine will now scan the image (notice the light on the scanner is now working).

Step 6. The Cricut Explore will cut around the outside of the image only. Preparing it for your project. Here is the shape cut out and laying on a piece of white paper.

Step 7. Apply your printed image to your project. Here is my finished Minnie on IPad Project I made using Print Then Cut and the brand new Cricut Explore Printable Vinyl that is coming out soon. Note: You can print on a variety of materials such as cardstock, printable vinyl and even sticker sheets.

It really is just that easy to do ! Think of all the project possibilities and all the images you will be able to use !
Stay tuned for more Print Then Cut projects I have made to share with you. Subscribe to my blog and my You Tube Channel so you don’t miss anything. Join us over at Let’s Learn Cricut Explore FB Group too !

All my comments are my own opinions on those products. I appreciate your support when you purchase using the post links.
Linda Zick
Sooooo excited about this. I don’t really think all the possibilities have registered with me, yet, but I find myself thinking about this all the time. It’s like being a kid and waiting for Christmas morning!
marie sierra
thank you for this very detailed method of using the new feature!!
Suzanne Davis
Wow !! Okay now I’m excited to get this new feature. Looks easy to use and now my mind is going crazy thinking of projects. Debbie you did it again…great explanation of the process. Thank you!!
Melinda Strange
Ha! You picked the right image to use as an example! I remember cutting the same image a couple of years for a granddaughter’s 3rd birthday card. The eyes alone took forever to place correctly – all those little parts! She has sense grown away from Minnie and onto Dora! Thanks for the tutorial!
Melinda Strange
Jay
ok good tutorial I just ordered my first cricut and I’m unclear on vinyl printing. does the cricut actually print the image or do you have to use a regular printer and then the cricut
admin
Hi Jay – You send the image from the Cricut Explore through your computer to your printer. The Cricut Explore is not a printer. Let me know if you have more questions…you will love your Cricut Explore. Be sure and join us over at Lets Learn Cricut Explore Facebook Group where we help people get up and running with their Cricut and inspire each other with our projects. Debbie
Angeliki
hello there, thank you for this, really helpfull as I am new with Cricut design space!! I wanted to ask you, if you know, is there any option to cut already printed images? Actually, i am creating my own images and printing them in a Copy Center, i don’t have that good quality, as at home, but how can I cut them with cricut ? I din’t yet got that:( ..as i am not printing and cutting the same time.
Debbie
Unfortunately Anggeliki, you would need to be printing the images from a home printer hooked up to your computer and Design Space so it can add the registration marks to your project. Without those marks, it will not be able to scan and know where to cut the shape out.
Heather Thomas
My question is best explained with what I’m trying to do. I want to upload an image from my computer. I want the cricut to cut around that image, which I can follow your tutorial, but I also want to add cut marks to cut circles on the image. Is this possible? Thank you!
Debbie
Heather – you would need to do that in a two step process…upload your image and then use the Slice feature to cut circles in it, then convert to Print Then Cut….that should work. I havent tested it though
Hayley
Thank you for this great tutorial! I am strongly considering getting a Cricut, and I have been intrigued by this feature. I was wondering how it might work for me to print a Word template I have to make a bridal shower invitation. There is the outline of a wedding dress with the text inside. Is that something that could be downloaded into the Cricut program so I could print and cut it?
Thank you!
Debbie
Hayley, Not easily. You could possible create it in a third party software like Illustrator and then import it in a file format that Cricut would read but that is kind of complicated if you are new to all this. Now what you can do, is pick a wedding dress image from the DESIGN SPACE software and use the Print Then Cut Feature to write the invite on the dress and cut them out that way. Let me know if you have more questions about this.
Rosie Waldt
I’m not sure about all this but I want to print and cut the Victorian Florals (iris) and don’t know how to put the color in places. Please help me!!!
Debbie
Hi Rosie – Those are the Anna Griffin Vintage Florals, correct? those are already Print Then Cut files and the colors are set. I dont believe you can change the colors.
Gale
Thanks for all the good info here. I have a question. I was in the process of printing and cutting over 200 invitations using the print and go feature. I was able to print all the invitations and then cut quite a bit of them (as it is faster to print than cut) but then cricut.com crashed and I had to reboot. I don’t want to print any more of my invitations, I just want to continue to cut them. How do I do that? The cutting marks are printed on every page.
Thanks
Debbie
Hi Gale – If you saved your file, which I hope you did in Design Space. Then open it up and hit go. let it go all the way to the print preview screen…but dont hit print, hit cancel print. that tricks you Explore to think you printed it and get the screen set up so you can add the image to your mat and cut out. I hope that makes sense. Good luck.
Frank
Hello, great tutorial, thank you so much! I was just curious if there was an alternative method for the registration marks? Maybe a barcode or QR code that the machine could read? I was only curious because the registration marks take up a substantial amount of space when trying to print and cut rows of small designs on the same page. I’m cutting out shapes from shrinky dink, so I was hoping to maximize the amount of things I could cut out at once since it adds up pretty quick 🙂 Thank you!
Debbie
Hello…thanks for the compliment on the Print Then Cut steps Tutorial I showed. At this time there is on alternative way to do Print Then Cut without the registration marks. There are currently limits to the print area sizes depending on which browser you are using. Chrome is 5.5″ X 8″ , Firefox and Internet Explorer are 6″ X 8″. Cricut is planning on expanding the print area sizes in future release but no date has been set to do so. The other thing I wanted to mention is that if you are doing multiple images on the same page they need to be atleast 1.5″ or larger to maximize the space…if you use smaller images, PTC will possibly lock up on you and not print. This has to do with the automatic bleed area left around the images. Let me know if you have further questions I can help answer. Enjoy crafting with your Cricut Explore !
SHEILA
For the Cricut Explore print then cut, would it be possible to print and cut multiple images on one sheet?
Debbie
You can but they will need to fit within a 5.5 X 8 section right now. Cricut is working on expanding the print then cut image in a future update
Natalie
Is print and cut the only way to cut your own silhouette out in vinyl? I do a lot of monograms in vinyl and they will just cut, so why can’t you do that with a one color silhouette?
Debbie
Hi Natalie – I think you must have watched my video or read my on using the Print Then Cut feature of Cricut Explore on the Cricut Printable Vinyl. You can certainly just cut out the vinyl directly with the Cricut Explore. I do it all the time 🙂
Debbie
Tiffany
I am new to the cricut. Since there were no instructions and its all online, I have a lot of questions I cant seem to find answers to without watching videos! My biggest set back at the time is the print and cut Do you have to print out the images first? I want to cut out on materials I can not fit in my printer, ex. construction paper. I tried to print on printer paper then taping it to the top of the material I wanted my image on. Needless to say, the cricut is tearing the top paper and even with the tape t wont always stay in place. how do you get the cricut to cut on the material you want without printing directly onto the material itself?
PaulA
I have this same question, and look forward to your answer. Thank you.
Debbie
Paula – You can not do Print Then Cut on anything other than white papers…the scanner just wont read it on other colors.
Debbie
Tiffany – The Cricut Explore will only work the he Print Then Cut if it is on white paper. The scanner is not set up to view it on colored paper of any kind. There is a document in the Cricut site with a Cricut Explore Manual you might find useful to learn how to use the machine…http://content.cricut.com/b/pdfs/design-space-manual/_dsfull.pdf
diane
Is there a way to print then cut on colored paper?
Debbie
No unfortunately, Print Then Cut was made to be used with White cardstock. The scanner has a hard time reading it on colored paper.
Latoya Goolesby
Hello My Registration marks isn’t dark its white and black mainly white…I just replace the ink and its doing the same thing.Is it any options to make registration marks dark?
Debbie
Latoya – There isnt any way to darken registration marks with the Explore itself. Are you using white cardstock? Print Then Cut only works best on white cardstock. If you see the registration marks and they are not dark enough…you can also try going over them with a black sharpie marker. That has helped some people. If that fails, call Cricut Support and see if they can help you further. Debbie
Kate
Is there a reason why my printer is making the items larger when printed? It is for some reason making it bigger.. Please help!!
Debbie
Hi Kate – Cricut Print Then Cut is set to have a bleed area around the image when you print them so they a true edge to edge color after cutting. If the size of your image is significantly larger than a 1/4″ or so around, then I am not sure why it would be doing that unless it is a setting on your printer. If that is the case, contact Cricut support at 877-727-4288 and they can help troubleshoot if it a setting on your printer communicating incorrectly with Design Space.
monica
Thanks for the video, very helpful! I was wondering if there is a way to add my shop name on the print and cut page on sticker paper inside of the registration marks without it being cut.
Debbie
HI MOnica – If you wanted to add your shop name you would just need to run it through it the printer and not put it on the Cricut mat to cut. That is the only way I know to prevent it from cutting it out.
Sharon
I’m trying to do a print and cut. However, my machine is not showing both the print and cut icons. It’s only showing the print. When I hit go – it asks to print, I do and then it allows me to load my paper to cut. The machine scans it but then says the machine can’t read and that I don’t have my paper lined up correctly. I’ve done it exactly. My machine keeps saying it’s scanning. I don’t know what to do. Any help would be greatly appreciated. I have the Cricut Explorer Air. Thank you in advance.
Debbie
HI Sharon – Are you registration marks dark enough on your paper? If not go over the marks with a back sharpie and see if that helps. Are you using only white paper ? It will not work on darker papers. Try that and see if it helps. If not you may need to re-calibrate and try again. If that fails, call Cricut Support so they can troubleshoot your issue for you. Good luck !
Nayeli
Hi, my cricut keeps saying that it can’t find or reach my printer but they are right next to each other so I can’t print. My printer is wireless and it’s connected to the network. And I also when I go to either cut or print the page always flickers…?
Debbie
Hi Nayeli – There could be a variety of reasons that is happening. I would suggest you contact Cricut Support at 877-727-4288 so they can help walk you through troubleshooting the issue which is hard for me to do online with you. Sorry I couldn’t offer more direct help.
Brandi
Can you print then cut on vinyl or just paper? If you can do it on vinyl, do I need special ink for my printer? Trying to figure it all out, I’m very new to this. I would like to make cute things for cups, shirts, etc. but everything I’ve done so far has only been one color vinyl. Please help. Thank you!
Debbie
Hi Brandi – To be able to print on Vinyl you need to use Printable Vinyl. Cricut makes some but there are other brands out there too. Look at Expressions Vinyl for more options as well. There is also Printable Iron On that you would use for shirts which would be different than Printable Vinyl. Most of the printable materials work with inkjet printers so you dont need special ink. Hope this info helps ! Debbie
Kelli
Hello!! I am new to this and have spent hours trying to figure this feature out and this was the best thing I have found! Thank you for this! My question is to use this feature, can you only do it on a material that works in your printer? I have figured out printable vinyl and stickers but what if I want to use a heavy cardstock that will not feed through printer. Is there a way to transfer the image onto a material that I can cut on?
Debbie
HI Kelli – Thanks for the kind words. For best results you really need to be able to print it directly on the paper you use in your printer. However, I know others have printed out the image on copy paper and then cut out the registration marks and glued to another material and run through the Cricut Explore. You would need to line it up exactly as it printed on the copier paper to get best results. Good luck. If you are interested in getting a new printer, I use an HP 5660 Envy that lets me use up to 110lb cardstock.
Emily tan
hey there, I wanted to cut my design at the precise location with different colour material. However once i click “go” on the preview it changed the arrangement automatically. I attached all images as one. How can I disable the automatic? My mat is 12 x 12, my canvas is 12 x 12, when come to cut it changed to 8 x 11? Why? what i suppose to do? Please help…….
Brad
i cannot get my image to show up on my print page so i can print my image on my printer? what am i doing wrong?
Debbie
Hi -I need a little more info to help answer that question…are you using a Cricut image or something else? Have you added it to your Design Space Mat and flattened it so it is a Print Then Cut ? Let me know a few more detail and I can see if I can help.
Lynnita schmidt
Debbie, my computer is set up to print to my printer (I print all the time), yet when I try to send a picture to my printer for Print Then Cut from Design Space, it’s saying my printer is not connected. Any suggestions on how to correct this? I can’t seem to find the answer anywhere. Thanks.
Debbie
HI Lynnita – A few people are having this issue. Call Cricut support and they can help troubleshoot where the connection is not happening. Be ready to tell them what printer, browser and operating system you are using. Its generally a very easy fix but dependent upon your set up.
Izzy Sammons
Hi! I am new to cricut, and I am having trouble with this feature. Is there any way I can turn off print then cut and just cut? If so, how? Thank you?
Debbie
You do not have to use the Print Then Cut Feature. You can certainly just cut out the paper/material instead. When you are in the Layers Panel, click on the image you want to cut if the scissor icon is not next to it, click on that and a window pops up and there are choices you can select…writing, cutting, printing. Most images can be changed but if it has a little printer icon next to the image those are only Print Then Cut files and can not be changed. Hope this info helps you.
Cara
Do you know how to make the calibration work with a laser printer??
Debbie
The calibration process should be the same process for a laser printer. If you are having trouble with it, I suggest you contact Cricut Support to see if there is some other issue going on. Good Luck.
Andrea
Does the Cricut explore Air have the Print and cut feature?
Debbie
Yes Andrea it does. I love the Print Then Cut Feature. Just make sure you have an inkjet printer that handles cardstock and you should be all set.
Rachel
Is there a certain kind of printer you need to print this stuff from? If so ,what kind do i need to get?
Debbie
any ink jet printer works with Cricut Printable products I have an HP 5660 which I really like
Heidi
Do you know the printer settings that work best? My printer only has plain paper, semi-glossy, glossy, ultra glossy, premium glossy, premium matte. When I did a test run the colors turned out bet on the plain paper setting on actual plain paper. I have not been able to reproduce the same color results on the printable iron on vinyl and have ruined an entire sheet. 🙁
I’m finding on the vinyl the black is grey and the dark pink has grey pixelation showing thru. Can you advise? Thanks for your help!
Tammy
Hi. I am new to the cricut as I have had mine only a couple of weeks, and I love it. My question is this…my son in law has a mud truck that I have a picture of and I was wanting to put it on a mug can I use the print and cut technique and print and cut vinyl to do this?
Debbie
Hi Tammy – Yes you can do a Print Then Cut on Printable Vinyl that you can put on a mug. You need to use a waterproof printable vinyl however. I have used this one by Papillo in the past http://www.papilio.com/inkjet%20waterproof%20adhesive%20film%20media.html I do recommend hand washing and not dishwasher for items used with this printable vinyl. Have fun ! Let me know if you have any other questions.